Tag Archives: DIY

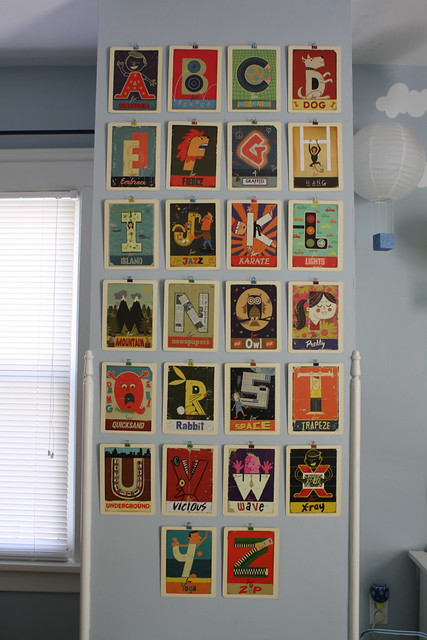
DIY Recycled Alphabet Book Wall Art

IMG_7491

We recently moved our daughter to a new room, and of course one of the first things that came to mind was ‘yay, we get to decorate again!!!’

What has been so fun about decorating this time around is that I can actually respond to her personality and likes, in addition to just doing what I want to do.

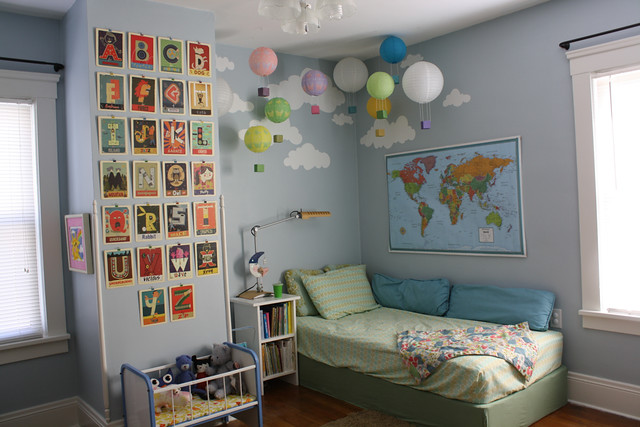
The fact is, our daughter, nearly three now (!) LOVES books. Ok, she’s a book-worm.  So, I wanted to do some wall decor that reflected that.  Normally, I would not “ruin” a perfectly good book for the sake of art, but I don’t believe I have done that here, mostly because it is actually the complete book up there on the wall, just in a different format.

IMG_7482

So without further ado, here is how I did it.

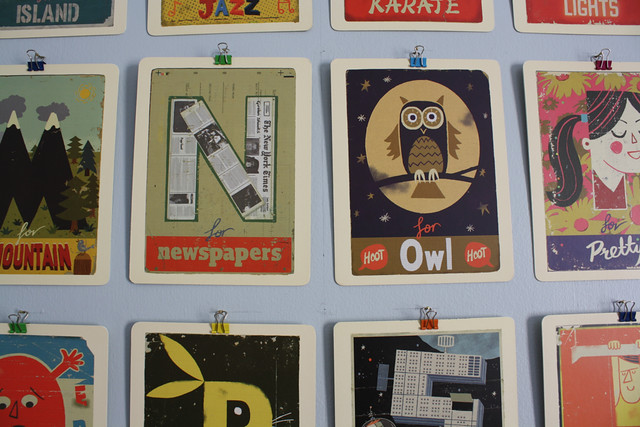
First, I had to find two alphabet books that were identical (since of course the book is printed with letters on the front and back of each page).  I really loved the illustrations in this book, called Paul Thurlby’s Alphabet.  Honestly, these letters are so great it’s almost a shame NOT to hang them on the wall to enjoy all the time!  I was really lucky to find both of my copies at a book sale run by my local library (for just 10 cents a piece!).  They were booth canceled copies from the library’s collection, so they had already had a long life of enriching children.

IMG_7484

This is a board book, so the pages are made from a thick, card stock material, which is perfect for this application.

Using an exacto knife, I very carefully cut each page from the binding.  With a sharp knife this is not hard to do.  Once I did that I had a page that had two nice rounded corners and two sharp 90 degree corners.  To make the corners look uniform I just cut the sharp corners so that they matched the rounded ones then ran some fine grit sand paper across it give it a nice, finished, and smooth look.

IMG_7493

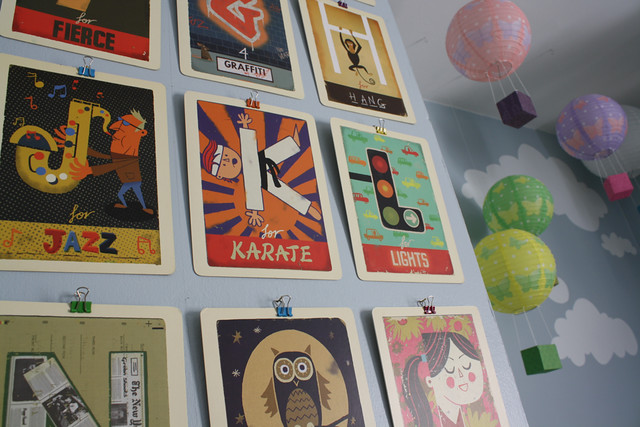
When it came to hanging the letters on the wall I knew I didn’t want to do any unnecessary damage to the pages by puncturing them with tacks or or by using tape, so I found some cute binder clips in a rainbow of colors and then hung those by the smallest nails I could find.

The hardest part of the entire project was actually putting them on the wall so that they were spaced evenly.  Luckily, with the binder clips you have a little wiggle room in this area.  It didn’t help that my wall is actually an inch wider at the top than it is at the bottom.  I found it best to work from the center of the design to the outside and from top to bottom.  In the close up photos you can see my registration lines.  I still have to paint over these.

Over all I am so pleased with how this project turned out and my daughter is too!

Leave a comment

Filed under Book Reviews, Home, Tutorials, Upcycled

DIY Baby Sled From Baby Bath Tub

Untitled

Untitled

You can’t get any easier than this little DIY.  Really, this is just a thinly disguised excuse to share some pictures of my little cutie eating snow.  But who doesn’t like to see cute baby pictures, right?

Untitled

All you need for this super simple DIY project is a baby bath tub, an electric drill, and some rope.  The hard plastic is very easy to drill.  Once you have your holes, all you need to do is thread the rope and POW you’ve got yourself a tow-worthy sled (don’t get your hopes up about any hill action with this sled I’m afraid).

Untitled

I will say that this sled works best on the sidewalk with just a thin layer of snow, but the thicker stuff is fun too, it just kept tipping over for us (much to the delight of our nearly 18-month-old daughter).

Untitled

Untitled

To keep up will all things zween (DIY projects, new plarn creations, baby pictures) like the zween facebook page!

Leave a comment

Filed under Just For Fun, Upcycled

Owlet Costume for Halloween

Owl costume two view

With Halloween less than two weeks away, you have plenty of time to whip up this cute owl costume for your little owlet!  This costume is great for a toddler who is just starting to walk and still holds out their arms for balance, making it look like they’re flapping their wings!  Virginia just started walking at the beginning of October so she’s definitely at this stage right now (as you can see!).

owl costume in flight

Why make an owl costume you ask?
For over a month I’ve been trying to decide what Halloween costume to make for Virginia.  Now that she’s 15 months old, and starting to show her own personality and interests, I thought I’d like to make her a costume to reflect something she seems to like at this point in her life.

Right now she seems particularly drawn to all things outdoors, specifically leaves, trees, squirrels, birds, airplanes, flowers, and the moon.  I’ve been collecting ideas on Pinterest, which is always a good starting point for inspiration, and found some cute ideas for trees, squirrels and owls.

owl costume03

Then this past Sunday I just had the urge to get this project started!  You know that feeling when you want to do something and you need to get it done NOW!?  Yeah, that’s pretty much how I felt.  At that point I was leaning toward making her a tree and incorporating a squirrel and a bird, kind of like this cute little costume from Probably Actually.

But I also just wanted to start making something and didn’t want to go to the store.  Does this ever happen to you?  I get so frustrated going to the store!  It seems like such a process these days and then I feel deflated because after all the time, effort, and money, I still don’t end up with what I really wanted.  So I was determined to make something work from what I already had in my fabric stash.

owl costume02

After digging around in the attic I settled on an old pink paisley cotton bed sheet that already had a number of chunks missing from other past projects, as well as a large remnant of blue fleece material I got for free at an Etsy event which I attended a few months back at the local fabric store, Stitch.

At this point I had abandoned the adorable tree idea and started to think about this cute owl costume that I saw from Martin Family Times.  I figured I could make a new crocheted owl hat (I made one for Virginia last winter) from the Repeat Crafter Me free pattern instead of making one from fabric as shown in the above mentioned inspiration.

Originally, I planned to make a cape of fabric feathers, similar to the inspiration, but I quickly changed my mind and went for a fitted poncho instead, mostly because I wanted something that she couldn’t easy take off!

owl costume front and back

How to make the feathery fabric owl poncho:
First I measured Virginia’s “wing span” (24 inches from wrist to wrist), which gave me the diameter for my foundation fabric (the blue fleece).  I also figured out how big of a hole I needed for her head (about a 4.5 inch diameter circle in her case) then added a small slit to be able to put it over her head.

Next I cut a second circle 4 inches bigger than the first from the “feather fabric,” in this case a light weight cotton bed sheet.

owl costume07

owl costume06

owl costume08

Now I took my paper pattern and folded it in half, than half again, and again, and again, etc, until I had a circle with evenly spaced segments to base my feathers off of.

Next I sewed the two circles together along the inner circle (where her head goes) and the outer circle to hold everything in place and cut out the outermost row of feathers.

owl costume09

For each successive row, I cut my paper pattern 4 inches smaller in diameter, traced it onto the front of the costume using chalk, sewed along the chalk line, then cut the feathers out, staggering them over the previous row.  To cut out the feathers while the fabric was sewn down, I used a pair of small, sharp scissors and was very careful not to cut through the foundation fabric.  After the feathers were cut out, I flipped them up and sewed all the way around the row of feathers again very close to the edge of the fold, thus hiding the original line of stitching.  This gave the feathers a little more “lift” and dimension.

owl costume05

owl costume11

owl costume12

I like the way the raw, fraying edges of the fabric adds to its “featheriness” don’t you?

Once the whole poncho was complete I sewed two vertical lines from the bottom up, leaving enough room for her arms, which created “sleeves” and also makes it nearly impossible for Virginia to remove it once it is on (HA!).

To finish it off I created my very own bias tape for the neckline (which I sewed on inside out, oops!) and a single, sew-on snap secures the neckline in the back to give it snug fit.

owl costume10

Crochet owl hat modifications:
As mentioned above, the crochet owl hat pattern that I based Virginia’s hat on was originally by Repeat Crafter me, which is a WONDERFUL pattern all on its own.  I’ve made this hat in several sizes following the pattern to the letter and they always turned out beautifully.  But for this time I wanted to alter the pattern a bit to make it a bit warmer.  To do this I first switched yarns (from 100% acrylic to 100% super wash Marino wool) and used a slightly bulkier yarn BUT kept the same size hook (H) so as to make a tighter stitch.  In addition to using a bulkier yarn, I also worked the whole pattern in half double crochet instead of double crochet.  Of course this meant that I had to add more rows.  All in all I’m very happy with the way the hat turned out, even though the half double stitch shows the seam way more than when I did a double crochet stitch, but I can live with that.

owl costume01

Oh, and did you notice that she’s got a little crocheted mouse?  I made it years ago from a pattern out of the book Amigurumi!: Super Happy Crochet Cute

owl costume04

I couldn’t be a prouder owl momma!

Keep up with all things zween make sure you like me on Facebook, where I update regularly about all things crochet, baby, thrifting, and upcycling!

I hope that you’ve enjoyed this post!  Happy crafting and happy Halloween!

1 Comment

Filed under Hollidays, Tutorials

Luau Party with DIY style

Untitled

Happy 1st birthday to my baby girl Virginia!  I can’t believe she is one year old today!

To celebrate Virginia’s first year of life we decided to throw her a Luau.  Why a luau you ask?  Well, it is July, so it seemed appropriate enough, but actually there is a funny story as to how we came up with the idea in the first place.  Back in February, when Virginia was just 7 months old, Jon bought a pineapple that sat ripening on our kitchen counter for several days.  We decided that it would be a good idea to put the whole pineapple on Virginia’s high chair tray so that she could touch it and explore the interesting texture of the pineapple.  Well, let’s just say she was a little apprehensive of this strange and poky fruit.  She didn’t cry or anything, just pulled her hands in toward her chest whenever the fruit got too near.  We have it on video and it’s one of my all time favorites.  Afterwords I joked to Jon that we should throw Virginia a Luau for her 1sth birthday.  After the seed was planted I just couldn’t get the idea out of my head, it just seemed like she was meant to have a Luau birthday, and here we are!

Of course we couldn’t just buy a few tiki torches, plastic leis, grass skirts, have a pig roast, and call it a day!  Read on to see how we transformed ordinary cardboard boxes, t-shirts, and produce into some pretty neat Luau decor.  I credit many of my ideas to Pinterest, where I got so much of my inspiration (see my luau pinterest board here), my husband for his amazing aptitude for drawing tiki masks and hibiscus flowers (he’s spent many hours painting signs for Trader Joe’s), and my mom awesome cake decorating abilities!

I first want to mention that this was a lot of work.  A LOT.  But it was worth it.  Just keep that mind that if you want to recreate some of the decorations that we have made, you will need a lot of time, or a lot of hands, to get it done.  So although this is a great recourse for people who want to throw their own DIY luau, it is not for the procrastinations out there.  Sorry.

Untitled

Untitled

First thing’s first, when going to a party, any party, you have to know where it is. We threw the luau in my parent’s back yard (actually, on their newly finished patio!) and while many guests had been there before, some had not and I wanted to not only set a festive mood, but make it obvious as to where the party was happening. Balloons on the mailbox are an obvious choice, but in this situation I thought tissue paper flowers (made out of recycled tissue paper from Virginia’s baby shower and originally used as decor in her first nursery) and hand-painted aloha signs on either side of the driveway were more appropriate.

1003278_689457624413213_2058661670_n

The above photo is by Mary Norgard, Virginia’s lovely Great Aunt!

Once guests make their way to the back of the house they are greeted by four tiki masks flanking the begining and end of my parent’s lovely stone path, and two giant hanging painted cardboard signs.  The first sign reads “Hau’ oli la hanau Virginia” which means happy birthday Virginia in Hawaiian, and the other reads “Aloha.”

Jon gets full credit for making and hanging the signs.  Each letter was hand-drawn on cardboard, cut out, painted with acrylic paint, and then strung together with twine.   I’d also like to mention that all of our cardboard decorations were made using recycled cardboard from Trader Joe’s (actually they are twice recycled, because before we used them for decorations we made a box maze for Virginia with them a few weeks ago!).

Untitled

Untitled

Untitled

Untitled

Hand-painted tiki masks were tied to tiki torches and trees, while hibiscus flowers were placed in potted flowers, hung from umbrellas, and tied to the legs of Virginia’s high chair.

Untitled

Untitled

Untitled

Untitled

Untitled

In accordance with Hawaiian tradition, each guest received a lei upon arrival to the luau.  Each lei was lovingly hand-made from recycled t-shirts using this tutorial that I found on Pinterest.  From experience, the softer high quality shirts yielded nicer “flowers.” To keep the leis from getting tangled, I hung them from a hand-carved wooden sculpture of a family that I bought from my mom during my trip to Ghana ten years ago. They sat next to the entrance of the luau on the table with the stereo (stocked with Hawaiian music CDs from the library) and a sign that reads “Mahalo” or “thank you.”

Untitled

Untitled

I used two green recycled t-shirts and some elastic to create Virginia’s grass skirt. It was VERY easy to make. To make one yourself cut a shirt horizontally underneath the arms. Using the bottom tube that remains, cut the shirt in 1.5 inch strips from top to bottom, stopping each cut about 2 inches from the bottom hem. That will become the top of your skirt. Repeat this process with a second shirt. Put shirt inside of the other and cut slits into both every 4 inches or so. Weave your elastic through the holes and sew the elastic to itself, creating the waist band. Trim the skirt to desired length. I showed my mom Virginia’s skirt earlier in the week and she decided to make one for Virginia’s older cousin. I really liked how they both turned out!

Untitled

Untitled

A wreath made from several paper drink umbrellas stuck into one of those packed-straw wreath forms from the craft store was a fun little project and another one that was Pinterest-inspired.  I thought it was a cute idea, but when I saw a box of over 100 of those tiny umbrellas for only $1 at a church rummage sale last weekend, I had to make one myself.  I wasn’t really sure where I’d end up putting it, but the gazebos door seemed to be as good a place as any.

Untitled

Untitled

And what would a party be without food?  We were a little ambitious with some of our food choices, as a lot of the things were a bit labor intensive but had to be done kind of at the last-minute.  We had a veggie tray, complete with palm tree made from a carrot and bell pepper sitting on an island of humus.  A pineapple cream cheese spread that looked like a pineapple.  A fruit salad in a watermelon bowl cut like a tiki mask.  To drink we had a pineapple, lemonade punch and the main course was Hawaiian ham and veggie kababs.  Finally, the cake, made by my mother, was in the shape of a roasted pig and came out fabulous (both in looks and in taste)!

Untitled

Untitled

Untitled

Untitled

Untitled

Untitled

My Mom also made a “smash cake,” which Virginia throughly enjoyed of course.

Untitled

Untitled

I can’t wait to have more luaus in the future!

**This post has just been added to the Make it Pretty Monday link party over on the Dedicated house, MWC Mondays on Making the World Cuer, and Motivate Me Monday on Keeping it Simple!

7 Comments

Filed under Events

Crafting family fun; DIY cardboard box maze

Untitled

If you are a parent, but even if you’re not, you’ve probably heard the age-old adage that a child will enjoy playing with the box that a toy comes in more than the toy itself.

Today I’d like to share some photos of a little family craft project (well, not so little actually) that we started one rainy, dreary morning this week.  It’s a giant maze made from recycled cardboard boxes that encompasses our entire dining room (I knew there was a reason we’ve been dragging our feet finding a dining room table).

Untitled

Untitled

All you need is several cardboard boxes (ours were complements of Trader Joe’s, thanks to my husband, our insider connection) and some packing tape or even duct tape.  Just fit the boxes together in whatever configuration you like and tape them together where needed to keep the structure stable.

Untitled

Virginia is just a couple of weeks from her first birthday now (!!!!) and isn’t yet walking.  She LOVES crawling around this maze.  We’ve had it up for about four days now and it’s been good for HOURS of entertainment!  She just loves to chase momma around the maze and be chased herself!  Papa got in on the action too of course, but at over six feet tall, he had some maneuverability issues.  By the way, as an adult, army crawling through a cardboard maze is quite the workout!  Sometimes we mix it up and place rattles, balls, and other small toys around the maze for her to find, but mostly she’s content to crawl in and out, squealing in delight all the way.

Untitled-1

This is a great project for those days when you just can’t get out and I’m sure would work great with older kids as well.

If this post has inspired you to create your own box maze I’d love to hear about it!  Write about it in the comments below or on the zween facebook page.  Happy crafting!

Untitled

2 Comments

Filed under Home, Just For Fun, Upcycled

High impact, low cost nursery

Untitled

Welcome to Virginia’s fun and whimsical nursery! It is said that a baby’s true “work” is play. Through play, babies are learning about complex ideas that we as grown-ups take for granted.

I wanted to create a comfortable and fun space for Virginia to do this very important work that she needs to do, but to be perfectly honest, I also wanted a space that would be comfortable and enjoyable for myself to spend time in too. Lucky me, this is the second nursery that I got to design for Virginia! (Check out her first nursery here)

Why two nurseries you may ask?  For the first six months of Virginia’s life we were living in an apartment, but in January of this year we moved into our very own home! The first time around I had the luxury of time when working on getting the space just the way I wanted it.  Something that was in much shorter supply 6 months later!  Luckily, we already had the furniture and some of the decor elements made, it was just a matter of creating and installing the new decals, a process that was much easier the second time around.

So without further ado, let’s take a tour shall we?  To give you a sense of scale let me just say that this room is about 11 feet by 8.5 feet.  We’ll start with what you see first when you first walk in the door.

Untitled

The statement piece is the floor to ceiling stylized deciduous tree on the opposite (west) wall, along with the adorable and over-sized woodland creatures.  Like in her previous room, this tree was made by cutting out shapes of contact paper and sticking them to the wall (for further information on this process, check out this post).  What I really like about these new decals is the boldness and simplicity of the white against the dark brownish gray wall.  It’s a wall color that I would never choose myself normally because I like really bright rooms.  but by adding so many decals, it really lightened and livens the room up.  To the left (out of view) is a bookshelf and to the right (also out of view) is her dresser.

Untitled

As you turn to your left (toward to south wall), you will see the 3 dimensional foam core butterflies that my husband made for Virginia’s first nursery.  These are adhered to the wall with simple, double-sided tape.  I like that it looks like they are flying through the window in a swarm and out the door of her room (just out of frame to the left).

Untitled

Untitled

Although we didn’t have a very large budget to create this nursery, my husband and I don’t like to sacrifice style.  We love searching for the perfect pieces on Craigslist and at thrift stores.  Some items were kept from my childhood and are ready to have another life with our daughter.  Though this does keep our budget in check, it also goes along with the values of our family, which we hope to instill in Virginia from the start.  That goes not only for the furnishings and decor, but toys as well.  With very few exceptions, nearly all of Virginia’s toys are either handmade, vintage, hand-me-downs, or second-hand.

Now we’ll turn 180 degrees to face the north wall and the crib. To the right I created a little reading corner under a hanging lamp. This is also a favorite spot for evening snuggles and nursing. The folding disc chair (which I’ve had since my college years) replaced the rocking chair from the previous nursery for a couple of reasons. First, there just wasn’t as much room this time around, and second, we use the nursery differently than when Virginia was a newborn (she is 10.5 months now). Now that she is more mobile we spend the majority of our time in this room playing on the floor (as opposed to nursing).  As far as nursing goes, we mostly do that in our bed where we can lie down and have some quiet mommy and Virginia time, away from distractions.  I LOVE the rocking chair, so we moved that to the living room where it can get plenty of use.

Untitled

Untitled

This corner is still a work in progress. I plan on making some very shallow shelving out of recycled shipping pallets to display/store some of Virginia’s books along the short wall between the window and the closet door. The lamp shade, along with the one pictured on the bookshelf, were crocheted out of white cotton yarn.  Even Virginia’s crib sheets were handmade from vintage full bed sheets.

And making our way full circle, Virginia’s dresser is nuzzled perfectly between the closet door (left) and entrance.  Her impressive book collection was mostly acquired through the local library’s book sales, or as gifts from family and friends.  The owl fabric collage is one that I made a couple ago.

Untitled

Untitled

And when looking for the perfect container for Virginia’s collection of wooden blocks, this vintage Du Pont blasting cap crate which housed my record collection for years, seemed to be the perfect fit, proving that toy boxes can take many forms.

Untitled

So how low-cost was this nursery?  Not including books and toys I calculate the cost just under $225!  Here’s how it breaks down.

Decor
Two rolls of Contact paper (to make decals)- $11
Foam core $5
White Lamp base, Goodwill $4
Cotton yarn for making two lamp shades $8

Furnishings
Vintage book shelf, Craigslist $25
White dresser, Craigslist $30
Crib (without mattress), Craigslist $100
Organic crib mattress, Target $80 (gift from grandparents) our cost $0
Disc chair, already owned for several years $0
5×7 Handwoven wool rug originally from World market, Craigslist $40
Child’s table and chair from my childhood $0 (table was handmade by my grandfather)


**This post has been added to Make it Pretty Monday on the Dedicated House, so go check out some other great links there!

1 Comment

Filed under Home, Uncategorized

Polaroid-Style Christmas Ornament

Untitled

Since this will be Virginia’s very first Christmas, my husband and I wanted to celebrate it by making photo ornaments of her to give to close family and friends.

If you would like to make your own Polaroid-style ornament, just follow along with my tutorial below.  There’s still enough time to make a nice DIY Christmas ornament with just the right amount of a retro flair!

Materials:
Here are the materials that I used.  Most can be substituted with things that you already have on hand.

wallet-sized photographs
ruler
Exacto knife/ cutting mat
bone folder (nice but not necessary)
heavy white paper (I used Reeves BFK)
ribbon
glue (I used a glue stick)
plastic sleeves to protect photo (again, nice but not necessary, I happened to have these laying around)
type writer (or just a pen if you want to have something written on your ornament)

Tutorial:
First choose the photo that you want to use and get it printed in wallet size. We ordered ours via email from Walgreens and they were ready for pick up in about an hour.

Untitled

You will then trim your photos so that they are 2″ x 2″ squares.
Next, cut out your paper to 2.5″ x  6″ using an Exacto knife and mark the “window” where your photo will be, as well as a center line at the 3″ mark with a pencil as a guide (this will help you line up your type if you are using a typewriter, though in this photo the type has already been added to the ornament).  There is a 1/4″ border around the window on the top and sides and about 3/4″ border along the bottom, giving it a Polaroid-like appearance.  If you are making several ornaments, as we did, it is easiest to make one and use it as a template for the rest.
Untitled

Now you can feed your paper through your typewriter to make your label. It is easiest to do this before you cut the window out.

Untitled

Carefully cut out the window using an Exacto blade and a ruler.

Untitled

Untitled

Using your bone folder to make a nice, clean, crease; fold the paper in half, width-wise.

Untitled

To help protect your photo and make it look a little more Polaroid-like, insert it into a plastic sleeve, cutting off the extra plastic.

Untitled

Now spread glue all over the back of your ornament, sandwiching in your now-protected photo as well as your length of ribbon.

Your done! Now we’ll just have to explain to Virginia what a Polaroid and a typewriter is when she gets older!

Untitled

Happy crafting and Merry Christmas!

1 Comment

Filed under Hollidays, Tutorials

DIY Ewok Costume for Baby

ewoks side by side

Although Return of the Jedi is my favorite of the Star Wars movies (which just so happens to feature the Ewok species), growing up in the 80s, it was the made for T.V. movies about the Ewoks that I was really drawn to, specifically the star Ewok, Wicket, and his young human sidekick, Cindel.  I can’t even imagine how many times I watched my VHS copies of Caravan of Courage and Ewoks: The Battle for Endor.  Now, 28 years after the Caravan of Courage debut, the Ewoks have found their way into my life again.

Untitled

The seed for this costume idea was planted this past summer when I found the brown furry fabric remnant (shown above) at a yard sale.  It was not a complete piece, but still had some good-sized sections remaining. The woman selling it said that her mom was a seamstress and that this fabric was most likely left overs from a coat lining. I couldn’t argue with the price either ($1).

I was still pregnant at the time but as soon as I layed eyes on it I knew I had to have that fabric.  Jon was with me, and being the voice of reason that he is (he hates clutter) said to me,  “What would you ever do with that?”  After a beat or two I proclaimed, “I’ll make an Ewok Halloween costume for the baby!”  And so, about 5 months later, here we are.

Untitled

To be honest, when I first came up with the idea I had serious doubts that I’d be able to pull it off.  It seemed a little too ambitious and out of my sewing capabilities.  I didn’t even know where to start.

Eventually I decided that my first plan of action would be to deconstruct a pre-existing sleeper in Virginia’s size to come up with the pattern for my Ewok suit, made out of the before mentioned fur fabric.  This is pretty self explanatory.  Find a garment in the size and style you want, take it apart, and use the pieces as a pattern for the new garment that you want to make.

Untitled

Untitled

You’ll want to keep in mind that your “pattern” wont have any seem allowance, so just add that on when you cut it out. My original deconstructed sleeper was assembled with a serger.  If you have one, great!  Mine does’t work, so I utilized the zigzag stitch on my Plain Jane sewing machine and called it a day.

Untitled

The only parts that I omitted completely from the design where the cuffs around the arms and neck.  The neck area will be covered by her hood, and the sleeves could be covered by mittens.  I was going to make mittens, but because of my daughters’ age (3 and a half months) and the fact that she would just be putting them in her mouth constantly, I skipped this detail.

Untitled

Above was my first fitting after constructing the suit. You may notice that there is a fit issue around her left foot. Oops!  I ended up removing that section, cutting out a new leg/foot piece and re-esembeling it. Then I realized that the new section that I just made was for the RIGHT foot! Oops again! eventually I got it all worked out so that she could have a decently fitting right AND left foot. Below is the completed Ewok suit.

Work in progress; Ewok costume!

Now all I had to do was make a hood.  For this I found a medium-sized men’s shirt at a thrift store (shown at the top of this post) in the perfect mustard yellow to contrast with the brown fur.  I wanted the neck opening of the shirt to become the face opening of the hood, so I cut off the sleeves and up the sides of the shirt as shown below.

Untitled

Now all I had to do was shape it. In the back section of the hood I sewed in a small piece of elastic to help make the hood more snug. This is not how Wicket’s hood looks, though many other Ewoks sport this hood style.  Though I did try the hood on Virginia periodically to see how it was fitting, I mainly used a small pie pumpkin to shape the hood.  Not only did the pumpkin stay perfectly still, I could actually sew the hood while on a form.  The hood was mostly hand sewn using brown embroidery floss so as to stand out and look very tribal, much like actual Ewoks look.

Untitled

Untitled

Untitled

Overall, I’m really happy with how this costume turned out.  Seeing that this is Virginia’s very first Halloween, I figured I’d go all out with making a sweet costume for her.  She’s too young to go trick-or-treating, and we don’t have plans to attend any costume parties, but I still had to get in the spirit and make an outfit, if only to share with close family and all of you on the world wide web.

Untitled

Thanks for stopping by.  I hope that if you have been inspired if you are planning on tackling your own Ewok costume.  If you do I’d love to hear about in the comments here!  As always, you can keep abreast of all things Zween by following me on Facebook and Pinterest.  Happy crafting and happy Halloween!
This post has been added to the linky party Made by You Monday on Skip to my Lou.

5 Comments

Filed under Hollidays

Wise Owl Plarn Wristlets

Untitled

Perhaps you are familiar with the nursery rhyme:

“A wise old owl lived in an oak.
The more he heard, the less he spoke.
The less he spoke, the more he heard.
Why aren’t we all like that wise old bird?”

I recently became acquainted with this nursery rhyme from Vernon Grant’s Mother Goose, one of my current favorite children’s books to read with little Virginia.  I love the illustrations and the fact that a lot of the nursery rhymes appear in a longer form than what I remember.  I also enjoy the short biography of Grant on the last few pages which describes his long career as an Illustrator, who is best know for creating the characters Snap, Crackle and Pop for Kellogg’s.

plarn owl wristlet work in progress

You may remember my first plarn owl wristlet, which appeared on my blog just over a year ago.  Well, it was such a big hit last craft show season, I decided to make a few new ones for the Last Minute Market, which I am so excited to be participating in this December 15th!

Untitled

plarn eyes for owls

You may notice that I’ve made some changes to the design since it’s original creation.  The new version features a grosgrain ribbon for the wrist strap, which feels much better than the crocheted plastic against the skin.  The eyes and beak are a slightly different design as well.   And the over-all shape of the bag is a bit bigger and squatter than the original, making it both roomier and easier to access.

Untitled

These plarn owl wristlets are made with all recycled and re-purposed materials; plastic grocery and newspaper bags, zipper, buttons and ribbon.   This owl is wise to think so highly of our planet and you should too!

Thank you for stopping by.  I’d love to hear your comments about this project if you have a minute or two.  Happy crafting everyone!

To keep up with all things zween, make sure to follow me on Pinterest and Facebook!

This post has been added to the linky party Make it Pretty Monday on the Dedicated House, and Made by You Monday on Skip to my Lou.

****UPDATE****

The NEW plarn owl wristlet version is now available in my Etsy store!

5 Comments

Filed under Book Reviews, Upcycled

Crochet Neckline; DIY Shirt Refashion

crochet shirt

Do you know how to crochet?  Do you have a plain shirt that is in need of a little pick-me-up?  Than this project is for you.  Crocheting a neckline is an easy way to transform a ho-hum shirt into something with a little more interest and feminine style.  I love how the openwork crochet creates a lace-like appearance without being overly fru-fru.

I only used three different stitches to create this particular neckline; chain stitch, single crochet, and double crochet.  The thread that I used was just a simple cotton crochet thread that I inherited from my Grandma.  It’s probably a size 10 thread, though it didn’t have a label so I’m not exactly sure.

Untitled

To begin, I used a 1mm crochet hook to pierce the fabric of the original shirt neckline and create a crocheted foundation for my new crocheted neckline.  This particular shirt has a double layer of knit fabric in the bodice, so it was a little difficult to pierce, which is why I used the smallest hook that I could use with the thickness of thread that I had.  In the places where I pierced the shirt I made a single crochet, then made three chain stitches between each single crochet stitch.  At this point, a fabric marker may come in handy so that you can be sure that your stitches are evenly spaced along the neckline.  Or, you can just wing it like I did.

Untitled

DIY Crochet neckline

Once you have a foundation row established, it is a good idea to find the middle of the shirt (front and back) and mark it with some contrasting yarn.  This will come in handy if you would like to do any shaping of your neckline.

From here on your stitches will depend on the look you want as well as the size and shape of your particular neckline.  For my shirt, I used various combinations of double crochet with chain stitches between and single crochet with chain stitches between.  Keep in mind that if you want your neckline to lay flat, the overall number of stitches will need to decrease as you add each successive row.

DIY Crochet neckline

crochet shirt

My original shirt had a neckline that was very deep in front and in back.  I really like it, but I thought that it was a bit low in the front, so I gave myself a little more coverage with the crochet neckline in the front than I did in the back.

To keep up on all things zween, please follow me on Facebook and Pinterest.

Happy Crafting!

This post has been added to the linky party make it, wear it Thursdays on The Train to Crazy, Make it Pretty Monday on the Dedicated House, The Inspiration Board Link Party on Caroyln’s Homework,  and Made By You Mondays on Skip to my Lou.

20 Comments

Filed under Tutorials, Upcycled