Tag Archives: crochet

The Lorax as Mascot and Muse

Untitled

“UNLESS someone like you cares a whole awful lot, nothing is going to get better.  It’s not.”

The Lorax has always been a story that has held a special place in my heart.  So here today I present my second attempt at bringing this scrappy character who is “shortish and oldish and brownish and mossy” to life in plarn (plastic yarn made from recycled grocery bags).

And since my first Lorax was sold at last years Last Minute Market, of course I needed a new mascot to accompany me this year as well!  Both versions are original designs, as I used no pattern for either.  The first one (below) was much larger than the second and based completely off the original illustrations by Dr Seuss.  The second one (top) was based more off of the movie version, hence the more pronounced eye brows.

The other differences between the two is that the current version is completely free-standing with its attached Truffula stump, and is also made of 100% recycled plastic bags (in the original design I used a foam material for the eyes).

the Lorax in plarn

I like how the new version shows the Lorax with his hands planted firmly on this hips, so that you can imagine him appearing before the Once-ler out of that first Truffula stump and saying “with a sawdusty sneeze, ‘I am the Lorax.  I speak for the trees[!]’ ”

Untitled

Untitled

Come out and see me and the Lorax at this years Last Minute Market on December 21st and I will be happy to share with you my passion for recycling single-use plastic grocery bags into high-end handbags, change purses, drinking vessel carriers, and medicine bags.  You really have to see my work to believe it.  What could have been trash or downcycled material is turned into items of beauty and functionality.

And don’t forget to like the zween Facebook Page, where I post all the latest news about what I’m up to!

Leave a comment

Filed under Events, Upcycled

The Plarn Project; Plastic Bags Transformed

Print

Today I am submitting my proposal to be a part of the Akron Mini Maker Faire on November 2, 2013.

Project Summary:
By transforming the ubiquitous plastic super market sack into chic and durable handbags, Emily Lindberg is diverting hundreds of plastic bags from landfills.  The Plarn Project; Plastic Bags Transformed, showcases these creations so as to inspire others to see the potential in what can be made out of trash.  In addition to inspiration, the project educates the public about the stress that plastic bags place on our ecosystem, and Emily will be instructing willing participants how to create their own plastic yarn (plarn) out of 100% recycled material.

Untitled

(Plarn medicine bag)

Untitled

(Plarn belt pouch for cell phone)

plarn owl wristlet

(Plarn owl wristlet purse)

Untitled

(Plarn shoulder bag)

Along with actual examples of my most recent plarn creations, I will be providing key statistics and facts about the effect that plastic bags have had on our environment since their introduction in 1977.

I will also be conducting ongoing demonstrations of plarn making for anyone who is interested and will have plenty of plastic bags on hand so that participants can make as much as they’d like!

I hope that my proposal is accepted, and if it is, I hope that you can make it out to see me!

***Update***

Looks like I’ll be going to be a maker in the faire!!!  So come on out to see me and all the other makers!  Also, be sure to like my facebook page for updates on all things zween as well as reminders about the faire.  See you soon!

6 Comments

Filed under Upcycled

Crochet Egg Cozy for Easter; Free Pattern!

Untitled

Just in time for Easter, some fun bunny shaped egg cozies to dress up your holiday baskets!  A couple of years ago I made these cute little hens, made from this pattern, and now they have some new friends to keep them company!  The following is my first ever published crochet pattern, so I apologize if there are any mistakes.  If you do find a mistake, or if you find any part confusing, please write a comment below and I will try to address it.

Untitled

Gauge
Gauge is important for this project because the cozy will need to fit around your egg. Because the size of eggs very, as well as your own personal crochet style (do you crochet more tightly or loosely?) you may need to adjust your hook size to accommodate these variables.  I use two different hooks to create these cozies; US size G and F.  If you are using the same or similar yarn as me (see below) try using the same size hooks as I do to start.  After about the 9th row or so of making the body, try it on your egg and make sure it fits well.  Adjust your hook size accordingly if this is not the case. (The photo below shows a cozy after completing row nine and my G hook.)

Untitled

Yarn
All cozies pictured here have been made with Caron Simply Soft. If you do not have this yarn available or if you would like to use a different yarn, it is labeled as “medium 4” yarn (worsted weight?) on the package and the recommended hook size is US H. If you do use a different yarn I would recommend sticking with a 100% Acrylic, as you will not have any unwanted stretch.

Supplies

Yarn (Caron Simply soft in any color or other similar 100% acrylic yarn of your choice)
Size G and F hooks (or size to obtain gauge, see above)
Tapestry needle
scissors
small safety-pin or stitch marker
fork

Untitled

abbreviations
st            stitch
sts          stitches
sl st        slip stitch
ch           chain
sc            single crochet
hdc         half double crochet
dc           double crochet
FPdc       front post double crochet

Untitled

Now lets begin the pattern!

Body (make one)
The body is worked from top to bottom in joined rows. The chain stitch (or stitches) at the beginning of each row does NOT count as the first stitch of the row.

With size G hook (or the larger of the two crochet hooks that you will be using to obtain gauge)
make a magic loop
Row one-  5 sc into loop, tighten loop, sl st into the first sc of the row (5 sc)
Row two-  ch2, 2 hdc into the first sc of the previous row and each remaining sc of the row, sl st into the first hdc of the row (10 hdc)
Row three-  ch2, 1 hdc into the first hdc of the previous row and each remaining hdc of row, sl st into first hdc of the row (10 hdc)
Row four-  ch2, *2 hdc into the first hdc of the previous row, hdc into next hdc,* repeat from * to * until the end of the row, sl st into the first hdc of the row (15 hdc)
Row five-  ch2, 1 hdc into each hdc of the previous row, sl st into the first hdc of the row (15 hdc)
Row six- ch2, *2 hdc into the first hdc of the previous row, hdc into next 2 hdc,* repeat from * to * until the end of the row, sl st into the first hdc of the row (20 hdc)
Row seven-nine- 1 hdc into each hdc of the previous row, sl st into the first hdc of the row (20 hdc)
Row ten-  with size F hook (or one hook size smaller than you used for rows 1-9), ch2, 1dc in each of the hdc of the previous row, sl st into the first dc of the row (20 dc)
Row eleven & twelve-  ch2, *1dc into first dc of previous row, 1dc in next st, 1FPdc in each of next 2sts,* repeat from * to * to end of row, sl st into the first dc of the row (20 dc)

leaving a six-inch tail, snip yarn, tie off and weave in the end.
Untitled

Untitled

Ears (make two)
The ears are worked from top down. The first three rows are worked in a spiral, while the remaining rows are worked back and forth. Mark the first stitch of each of the first three rows using the safety pin or stitch marker so that you know where the rowed begins.

using size F hook (or the smaller of your two hooks to obtain gauge) make a magic loop
Row one- 6sc in loop, tighten loop (6 sc)
Row two- *2sc in first st, 1sc in next st,* repeat from * to * twice (9 sc)
Row three- 1sc in each st (9 sc)
Row four- flatten the bowl shape that you just made and work 4sc across, connecting the two sides, ch1, turn (4 sc)

Untitled

Untitled

Untitled
Row five-eleven- 1sc in each st, ch1 turn (4 sc)
at the end of row eleven, sl st into the first sc of that row (creating a fold at the bottom of the ear), leaving a 10-12 inch tail, snip yarn, tie off, make second ear, position both ears on body and attach.

The photo below shows the completed ear before folding the bottom in half and slip stitching into the first stitch of the last row.
Untitled

Tail (make one)

Using your fork and the tutorial found here, make a tail and attach it to your cozy.

Untitled

Your done!

*** Feel free to make these cozies for your personal use.  You may also make and sell egg cozies from my pattern locally (not online).  Please do not copy this pattern and claim it as your own. Please do not re-publish photo’s as your own.***

If you make an egg cozy I’d love to see it!  Post a picture on the zween facebook page or link to your blog post in the comments below!  Speaking of Facebook, make sure to keep up with all things zween by following me there as well as on Pinterest.

Untitled

3 Comments

Filed under Hollidays, Pattern

Crochet Neckline; DIY Shirt Refashion

crochet shirt

Do you know how to crochet?  Do you have a plain shirt that is in need of a little pick-me-up?  Than this project is for you.  Crocheting a neckline is an easy way to transform a ho-hum shirt into something with a little more interest and feminine style.  I love how the openwork crochet creates a lace-like appearance without being overly fru-fru.

I only used three different stitches to create this particular neckline; chain stitch, single crochet, and double crochet.  The thread that I used was just a simple cotton crochet thread that I inherited from my Grandma.  It’s probably a size 10 thread, though it didn’t have a label so I’m not exactly sure.

Untitled

To begin, I used a 1mm crochet hook to pierce the fabric of the original shirt neckline and create a crocheted foundation for my new crocheted neckline.  This particular shirt has a double layer of knit fabric in the bodice, so it was a little difficult to pierce, which is why I used the smallest hook that I could use with the thickness of thread that I had.  In the places where I pierced the shirt I made a single crochet, then made three chain stitches between each single crochet stitch.  At this point, a fabric marker may come in handy so that you can be sure that your stitches are evenly spaced along the neckline.  Or, you can just wing it like I did.

Untitled

DIY Crochet neckline

Once you have a foundation row established, it is a good idea to find the middle of the shirt (front and back) and mark it with some contrasting yarn.  This will come in handy if you would like to do any shaping of your neckline.

From here on your stitches will depend on the look you want as well as the size and shape of your particular neckline.  For my shirt, I used various combinations of double crochet with chain stitches between and single crochet with chain stitches between.  Keep in mind that if you want your neckline to lay flat, the overall number of stitches will need to decrease as you add each successive row.

DIY Crochet neckline

crochet shirt

My original shirt had a neckline that was very deep in front and in back.  I really like it, but I thought that it was a bit low in the front, so I gave myself a little more coverage with the crochet neckline in the front than I did in the back.

To keep up on all things zween, please follow me on Facebook and Pinterest.

Happy Crafting!

This post has been added to the linky party make it, wear it Thursdays on The Train to Crazy, Make it Pretty Monday on the Dedicated House, The Inspiration Board Link Party on Caroyln’s Homework,  and Made By You Mondays on Skip to my Lou.

20 Comments

Filed under Tutorials, Upcycled

DIY recycled sweater sleep sack

Untitled

Fall is in the air and it’s time to start thinking about how to keep our new baby nice and toasty warm once the cold weather settles in.

It has been said that loose bedding in cribs can pose a suffocation hazard in babies less than one year old.   So in my quest to negate this issue I came across some “wearable blankets” such as this one by Baby in a Bag and this one by Halo.  They seemed to be good products with good reviews and reasonable prices (about $30 each from what I can tell).  But naturally, I wanted to see if I could make one myself.

Which lead me to my new obsession with Pinterest, where I found this wearable blanket project by Ashley.  In her blog post, she gives an excellent tutorial on how to make a baby sleep sack made with fleece fabric.

I was all excited about this project but…

I had no fleece and did not like the prospect of driving a half hour (one way) to the nearest fabric store.  Wa wa.

But, lets face it, buying new fabric is not my style anyway, so I started to look around at what I already had.  That’s when I discovered two bags of old clothes set aside for donation.  When I found my old cashmere sweater (originally purchased at a thrift store) in the pile I had a eureka moment.  That’s it!  I’ll use this!

Untitled
(see how much she likes it!)

When I started this project I planned on using Ashley’s tutorial as-is, and even found a detachable zipper to use from a hoodie that I was also about to donate.

Untitled

The pink cardigan shown above is what I used as the guide for the neck, armhole, and torso width of my pattern as per Ashley’s suggestion (see Ashley’s original post for further explanation of this point).

Untitled

Notice that I lined up my neckline with the neckline of the sweater.  I also ended up extending my pattern to include the entire length of the sweater.

However, I quickly decided that I would need to make some adaptions to her project since I had a limited amount of fabric to work with.  Since my sweater was only so wide, I didn’t really have enough of it to make the two separate pieces for the front (because I would need about 1.5 inches more in the width).  You see, in the original design, the sleep sack is supposed to have a zipper running down the entire length of the front.  But, since my sleep sack was made from a stretchy knit sweater, I figured, why not make it a pull-over?

So that’s what I did, I just cut two pieces that were basically the same then sewed them together at the shoulder seams and down the sides.  Remember how I used the bottom of the sweater as the bottom of the sleep sack and the neckline of the sweater as the neckline of the sleep sack?  Well, that meant no fraying in those areas!

Untitled

Untitled

The arm holes, on the other hand, were fraying terribly.  So I made a crocheted ribbed edging around them.  Just one row of single crochet worked directly into the sweater and 3 rows of double crochet worked into a “ribbed” pattern.  (first row; sc into sweater all the way around armhole.  Second row; dc in each sc.  Third row; front post dc in first two dc, dc in next two dc, repeat for entire row.  Fourth row, same as row three).

Untitled

Since I used the original neckline, I could have just left that as-is, but I decided that I wanted to open it up a little more. After I cut the neck hole I added a decorative crochet edge (row 1; sc all the way around neckline into sweater, row 2; picot in first st, sc in next st, repeat all the way around).

Untitled

I could have left this project alone at this point and basically have a baby-sized sweater night gown, but I wanted to make sure that her legs and feet would stay nice and warm (that was the whole point after all). So I added a zipper along the bottom edge, which gives easy access for midnight diaper changes!

Untitled

Untitled

Untitled

I love how light weight and warm this cashmere sweater is. And oh so soft! As you can tell, Virginia likes it too…

Untitled

to keep up to date with all things zween please like my facebook page.  And, if you’re a Pinterest junkie like me you can find me there too!

Find this post helpful?  I’d love to hear about it, so leave me a comment below!

Happy crafting!

oh yeah, I couldn’t resist making a “night cap” with one of the left over sleeves. Don’t worry this is just for fun and a photo shoot; she won’t actually be sleeping in it.

Untitled

This post has been added to the linky party Make it Pretty Monday week 16 over on the dedicated house, Made by you Mondays over on Skip to my Lou, and Make It Wear It Thursday over on The Train to Crazy, so check them out for some linky fun!

12 Comments

Filed under Tutorials

Meet Virginia + Crochet Turtle Photo Prop

Untitled

Today I’d like to introduce a very special little lady, my daughter, Virginia!  Virginia was born on July 15th, which makes her just 13 days old today.  We have so enjoyed having her in our lives so far and are looking forward to so many exciting years in the future.

Virginia’s turtle shell was inspired by this photo I saw on Pinterest.  To replicate the design, I made 6 granny square-esque pentagon motifs in green with brown boarders and connected them using a single crochet stitch (also in brown) which gives a raised appearance like you see in the photo above.  The shell can also be worn with the reverse side up, giving a more flat appearance, as seen in the other photos.

Untitled

Untitled

Doesn’t Virginia make a happy little turtle? Stay tuned for more crafty baby and nursery ideas!

Thank you for stopping by and happy crafting!

2 Comments

Filed under Uncategorized

Baby Steps

It’s a new year and it’s starting out to be a good one!  Above is a recent project that I tackled (more on this later) that ties together what has been going on in my life these past few months.

Lately, I’ve been in a bit of a creative slump.  It’s winter, it’s cold, it’s dreary.  That never helps.  But it’s more than that.  I’m working more hours in my “day job” and I tire much more quickly than I used to.  Oh yeah, and I’m pregnant with my first child!

As of today I am 16 weeks along and every day is an adventure as to how my life is changing and will be completely different from now on.  I’m going to prenatal visits with a midwife, I listen to podcasts about pregnancy and babies (to learn about things such as birthing options, baby carriers, breast-feeding/pumping, etc.), I watch documentaries about the current situation most American women find themselves in when giving birth (Pregnant in America and The Business of Being Born are two of my favorites so far and are currently able to be streamed via Netflix), I follow along month by month with my used copy of What to Expect When You’re Expecting, and I keep in touch with my good friend, Sarah, who is my pregnancy mentor, since she just gave birth to her first child three months ago (congratulations Sarah!).  What a great source of support and knowledge!  My husband and I are taking things one day at a time and trying not to stress out too much about the whole thing.  So far, it seems to be working.

Now that the first trimester is over and I’m regaining some of my previously lost energy, I feel more motivated to make things again (besides just this baby).  Motivation has been a real hinderance lately.  Though I want to start creating again, I find myself feeling a bit blocked as to what I want to do.  Do I continue making things almost exclusively with recycled materials?  Do I continue seeking out shops to potentially sell the things I make, as well as keeping up with the shops I’m already in?  Do I switch gears completely and just start making things for this baby?  I think the answer is probably to do a combination of all of these things.

Sometimes it’s the hardest to just get started, especially after what feels like a long break.  Taking things slow is probably a good way to start, which is how I came to make this crocheted baby dragon.  But let me back up first, because before I could make anything, I had to get organized.

On January 1st we took down all of our Christmas decorations, clearing the slate for the new year.  After that was done I was ready to do something that had really been getting me down; cleaning out my studio to make room for the baby.  I realize we have plenty of time before the baby will be here but it felt good to find new homes for all my tools and supplies.

The long, low dresser filled with my most essential tools (scissors, glue, hammer, pliers, crochet hooks, knitting needles, fasteners, etc) found a perfect new home as a buffet in our dinning room, conveniently located next to our dinning room table,  which is an excellent place to work.  The vintage suit cases underneath store finished products and also double as displays during craft shows.

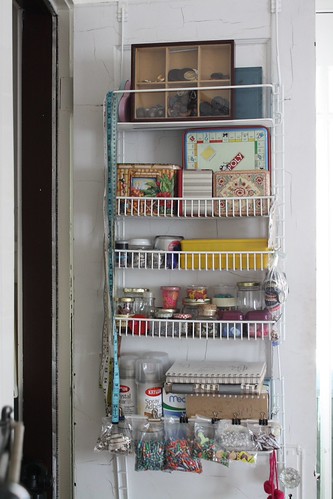
On the underutilized side of our living room, my work table found a new home right next to a small closet which previously housed little more than our vacuum (not too necessary with all hardwood floors).  After moving the vacuum to the closet of the baby’s room, I had plenty of space for bigger essentials such as my sewing machines, irons, ironing board, sewing threads, and my most frequently used yarns.

My favorite feature of this storage space are the shelves that hang from the top to the door. We found these for only a dollar at a yard sale last summer! Now I can store and see all my little do dads such as buttons and beads. Love it!

Other, less used supplies, are now stored neatly in the attic and are still easily accessible.

I mention this because having an organized workspace is very important to many people’s creative process, including my own.  Though I feel lucky that I had a whole room to use exclusively for my work for an entire year, it did pose a problem of its own; it was impossible for me to keep it organized!  Now, with everything out in our living space, I am forced to clean up after my projects daily, since I am now unable to just shut the door and forget about it.

Now that I was organized I had to think of some things to make.  I started by processing a bunch of plastic bags that people have been giving me into new plarn.  Though it’s nice to have all those bags made into plarn and ready to be crocheted, I haven’t thought of what I want to make with them next yet.  So the plarn is on hold for now.

Then I started to look at my yarn stash and see what I wanted to make with that.  I couldn’t think of anything so I turned to Ravelry for some inspiration.  That’s where I found this free Baby Snow Dragon Pattern.  Originally, I had set out looking for something cute to make for my new baby.  Since this little guy has safety eyes it’s not exactly baby material since I guess it could be a choking hazard.  But it was the perfect application for my last bit of my green silk bamboo yarn, and since I haven’t done much amigurumi yet, it was a good exercise in the process.

two view dragon

More importantly, it got me making again, happy to be using up yarn in my stash, and excited about having a baby to make cute things for.  And I guess that’s all that really matters right?

PS- Doesn’t this baby dragon look like it needs a hug?

PPS- Here are my baby bump pictures that where take every two weeks starting at 12 weeks and ending with a picture that was taken today.


12 weeks


14 weeks


16 weeks

This post has just been added to Made By You Mondays over on Skip to my Lou!

2 Comments

Filed under About, Home

Custom, Practical, Crochet

I’m a pod cast junky.  There, I admit it.  I love to listen to them while I’m making stuff.  But lately I’ve been bummed out because my headphones are so uncomfortable to wear.  Unfortunately, I can’t wear ear buds at all, and trust me I’ve tried.  So I have to wear clunky head phones instead.

The problem I usually have with headphones are the cheep foam covers that fit around the ear pieces.  These are always the first thing to go on headphones.  In the case of this particular pair, the foam covers went years ago so I bought replacement covers at some big box store that ended up being way too big and ill-fitting.  But I used them for a long time, until finally this morning I had had enough and I made custom crochet covers for them.

This is not the first time I’ve fixed headphones in this way.  The first time I did it was in 2008.  We were barely into our Peace Corps service and still living with our host family.  Somehow the foam covers of the headphones that I brought from the US had completely disintegrated by month two of life in Morocco.  Sure I could have requested that a new pair be shipped to me in my next care package, or even bought some in Morocco, but instead I chose the DIY route and crocheted myself a new pair of covers.  To my delight they worked great!

About one year after later while we were in Rabat for our mid service medical exams, I noticed that one of my volunteer friends, Dan, was having the same problem with his headphones.  Of course I just happened to have some yarn and a crochet hook on me at the time (who travels without these things?), so while he wasn’t looking I quickly made him a home-made pair too.  To my surprise, he was still using them one year later when we finished our service in November, 2010!

So this is my third time making headphone covers.  They are really easy to make.  Mine are just made by crocheting single crochet in the round in the general shape of the headphones until they are the appropriate size (most headphones are not perfect circles, so you’ll want to use your specific pair as a guide and get your crochet cover to match up as closely as possible).  Then I crochet one or two rounds more without increasing and the final round is a double crochet/single chain pattern that you weave a piece of yarn into so as to synch the cover over the headphone.  Easy!

This is not a glamorous project, but it is practical.  There are a lot of instances where something minor brakes or wears out on something that we use often.  Though we are capable of figuring out a way of repairing or replacing the worn/broken component, we tend to take the easy way out and just throw it away and buy a new whats-it.

Do you have a story about a time you used your crochet skills (or sewing, or knitting, or crafting, or woodworking skills, etc) to bring something broken back to life?  I’d love to hear them!  Leave a comment below or on the zween facebook page.

Happy crafting!

Leave a comment

Filed under Just For Fun

I heart artichoke hat

Here’s a fun little project that I’ve been tackling the last few days.  The inspiration for this hat came this past Saturday from my table neighbor at the November Cleveland Craft Coalition Bazaar.  She had a beautiful scarf crocheted in a variegated fall color way using a crochet stitch that I had never seen before called the crocodile stitch.  Since I love learning new techniques,  I decided that I had to teach myself how to make this stitch.

The process of learning the technique was fairly easy with the internet.  All I had to do was google “crochet crocodile stitch” and I got tons of results.  I started with learning the basics from this video on YouTube.  After I learned the basics of the stitch I was ready to put it to use.

Though I think a scarf is a great application for this highly textured stitch, I wanted to try a hat, which is how I found this free crocodile stitch hat pattern.  What’s interesting about this pattern is that it’s worked from the bottom up, which is opposite from the way I am used to crocheting.  Along with becoming very familiar with the crocodile stitch by making this hat, I also needed to learn how to make a half double crochet foundation row, for which I used this YouTube video.  Unlike a regular chain stitch foundation row, the half double one allows for much more stretch.

As soon as I saw the pattern online I knew right away that I wanted to make my hat look like an artichoke.  I mean this stitch just screams ARTICHOKE to me!  Luckily, I had nearly an entire skein of Caron Simply Soft yarn in Dark Sage from the shamrock garland I made last March.

It was very easy to adapt the before-mentioned pattern to look more artichoke-like.  All I needed to do was create a stem on top to complete the look.  Easy!

Have you made something recently that utilizes a new technique?  I’d love to hear about it, or better yet see it!  You can post a photo of a finished project using a new technique that you learned on the zween facebook page, or just tell me the story of a project in the comments below.

7 Comments

Filed under Just For Fun, Pattern

Halloween How-To: Crochet Bear Ears

Here’s some fun, last-minute bear ears I made last night.  They only took about a half hour to make!  So, if you know how to crochet and need a really quick costume for next year, this is something to keep in mind.

How to make cute head band-style Halloween ears;

First crochet around the head band in single crochet.  I left just a little bit of room on each end where it tucks behind my ears.  Once you have single crochet along the whole band fasten off.

Now decide were you want your ears to be.

Ears (this pattern is for making rounded, bear-like ears, but could easily be adjusted to make triangular cat-like ears, or long bunny-like ears)

First ear

Row one- With the RIGHT SIDE facing and a new strand of yarn, single crochet into 6 sts (please note that I used a fairly thick yarn, so if you are using finer yarn you may want to adjust the number of stitches.) Ch 1, Turn. (6 sts)

Row two- 1sc in each st, ch 1, Turn . (6 sts)

Row three- sc 2 together, 1 sc in next 2 sc, sc 2 together, ch 1, Turn.  (4 sts)

Row four- 1 sc in each st, fasten off yarn

Second ear

Row one- With the RIGHT SIDE facing, repeat row one through four of first ear.  (this means that you will be starting from the right side of each ear and working left)

Finishing

With the RIGHT SIDE facing and starting on the right side of the right most ear; sc around ear, 1 slip stitch in each sc between ears, sc around second ear, fasten off.  Weave in all ends.

Inner ear (optional)

At this point you have ears!  If you used a fairly bulky yarn and crocheted it fairly tightly, they should have nice structure and stay up all by themselves.  Now you can add a little bit of pink to the centers to make them look more authentic.  For this part you could just cut little pieces of pink felt that are the appropriate size and shape, or, you can crochet them like I did.  To crochet the inner ears I used a finer yarn and a smaller hook and I followed the same pattern as for the outer ears but did a single crochet around the entire shape to end it.  After that I just used some black thread to sew the inner ears to the outer ones.  Easy!

I was working on some plarn owls last night and suddenly had the idea to make these.  I wasn’t sure if my co-workers would dress up for Halloween so I wanted to have something just in case.  Turns out nobody did, so they ended up staying in my purse all day.  Oh well!  I think these would look really cute with a matching crochet tale and mittens complete with little claws!

CRAFT Halloween Contest

4 Comments

Filed under Hollidays, Pattern