DIY Recycled Alphabet Book Wall Art

IMG_7491

We recently moved our daughter to a new room, and of course one of the first things that came to mind was ‘yay, we get to decorate again!!!’

What has been so fun about decorating this time around is that I can actually respond to her personality and likes, in addition to just doing what I want to do.

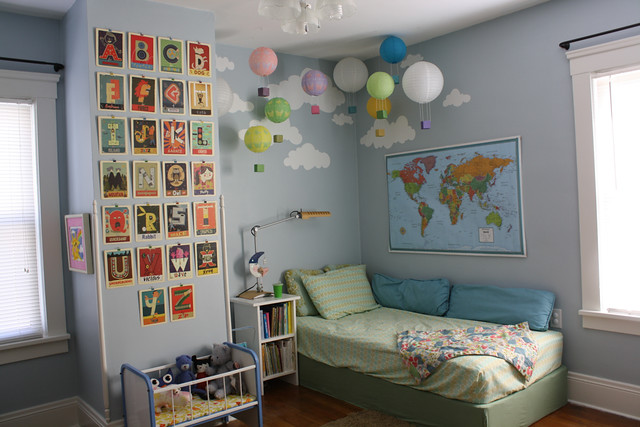
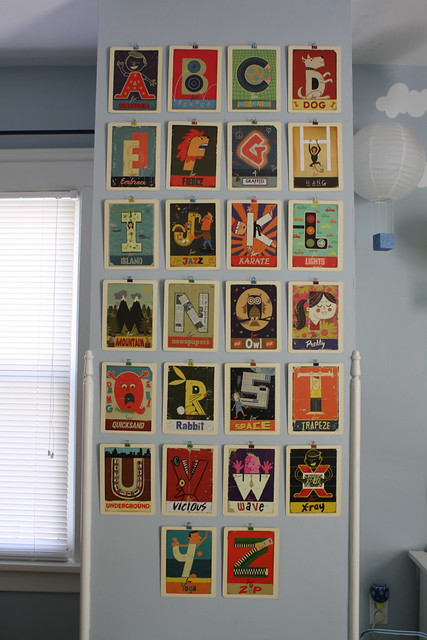
The fact is, our daughter, nearly three now (!) LOVES books. Ok, she’s a book-worm.  So, I wanted to do some wall decor that reflected that.  Normally, I would not “ruin” a perfectly good book for the sake of art, but I don’t believe I have done that here, mostly because it is actually the complete book up there on the wall, just in a different format.

IMG_7482

So without further ado, here is how I did it.

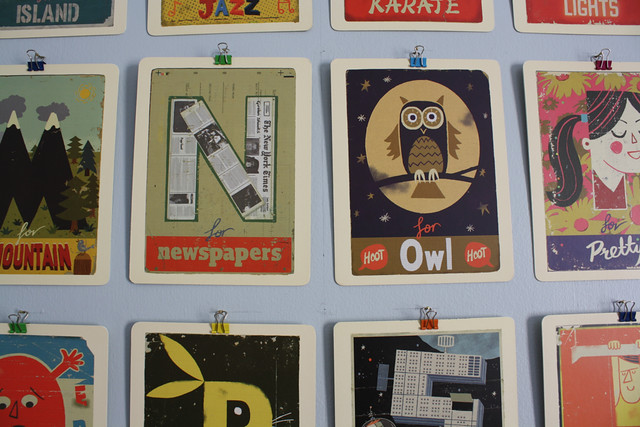
First, I had to find two alphabet books that were identical (since of course the book is printed with letters on the front and back of each page).  I really loved the illustrations in this book, called Paul Thurlby’s Alphabet.  Honestly, these letters are so great it’s almost a shame NOT to hang them on the wall to enjoy all the time!  I was really lucky to find both of my copies at a book sale run by my local library (for just 10 cents a piece!).  They were booth canceled copies from the library’s collection, so they had already had a long life of enriching children.

IMG_7484

This is a board book, so the pages are made from a thick, card stock material, which is perfect for this application.

Using an exacto knife, I very carefully cut each page from the binding.  With a sharp knife this is not hard to do.  Once I did that I had a page that had two nice rounded corners and two sharp 90 degree corners.  To make the corners look uniform I just cut the sharp corners so that they matched the rounded ones then ran some fine grit sand paper across it give it a nice, finished, and smooth look.

IMG_7493

When it came to hanging the letters on the wall I knew I didn’t want to do any unnecessary damage to the pages by puncturing them with tacks or or by using tape, so I found some cute binder clips in a rainbow of colors and then hung those by the smallest nails I could find.

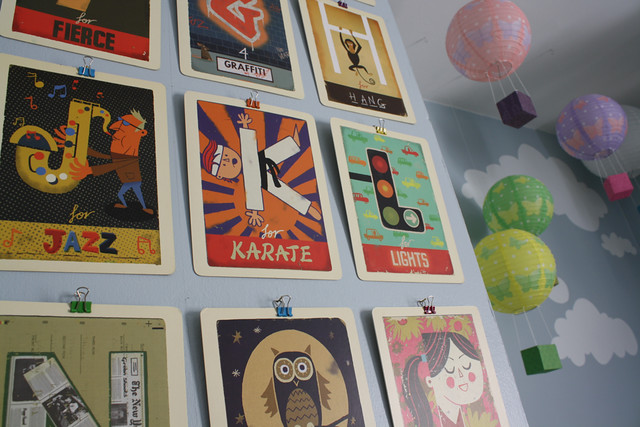
The hardest part of the entire project was actually putting them on the wall so that they were spaced evenly.  Luckily, with the binder clips you have a little wiggle room in this area.  It didn’t help that my wall is actually an inch wider at the top than it is at the bottom.  I found it best to work from the center of the design to the outside and from top to bottom.  In the close up photos you can see my registration lines.  I still have to paint over these.

Over all I am so pleased with how this project turned out and my daughter is too!

Leave a comment

Filed under Book Reviews, Home, Tutorials, Upcycled

DIY Baby Sled From Baby Bath Tub

Untitled

Untitled

You can’t get any easier than this little DIY.  Really, this is just a thinly disguised excuse to share some pictures of my little cutie eating snow.  But who doesn’t like to see cute baby pictures, right?

Untitled

All you need for this super simple DIY project is a baby bath tub, an electric drill, and some rope.  The hard plastic is very easy to drill.  Once you have your holes, all you need to do is thread the rope and POW you’ve got yourself a tow-worthy sled (don’t get your hopes up about any hill action with this sled I’m afraid).

Untitled

I will say that this sled works best on the sidewalk with just a thin layer of snow, but the thicker stuff is fun too, it just kept tipping over for us (much to the delight of our nearly 18-month-old daughter).

Untitled

Untitled

To keep up will all things zween (DIY projects, new plarn creations, baby pictures) like the zween facebook page!

Leave a comment

Filed under Just For Fun, Upcycled

The Lorax as Mascot and Muse

Untitled

“UNLESS someone like you cares a whole awful lot, nothing is going to get better.  It’s not.”

The Lorax has always been a story that has held a special place in my heart.  So here today I present my second attempt at bringing this scrappy character who is “shortish and oldish and brownish and mossy” to life in plarn (plastic yarn made from recycled grocery bags).

And since my first Lorax was sold at last years Last Minute Market, of course I needed a new mascot to accompany me this year as well!  Both versions are original designs, as I used no pattern for either.  The first one (below) was much larger than the second and based completely off the original illustrations by Dr Seuss.  The second one (top) was based more off of the movie version, hence the more pronounced eye brows.

The other differences between the two is that the current version is completely free-standing with its attached Truffula stump, and is also made of 100% recycled plastic bags (in the original design I used a foam material for the eyes).

the Lorax in plarn

I like how the new version shows the Lorax with his hands planted firmly on this hips, so that you can imagine him appearing before the Once-ler out of that first Truffula stump and saying “with a sawdusty sneeze, ‘I am the Lorax.  I speak for the trees[!]’ ”

Untitled

Untitled

Come out and see me and the Lorax at this years Last Minute Market on December 21st and I will be happy to share with you my passion for recycling single-use plastic grocery bags into high-end handbags, change purses, drinking vessel carriers, and medicine bags.  You really have to see my work to believe it.  What could have been trash or downcycled material is turned into items of beauty and functionality.

And don’t forget to like the zween Facebook Page, where I post all the latest news about what I’m up to!

Leave a comment

Filed under Events, Upcycled

Owlet Costume for Halloween

Owl costume two view

With Halloween less than two weeks away, you have plenty of time to whip up this cute owl costume for your little owlet!  This costume is great for a toddler who is just starting to walk and still holds out their arms for balance, making it look like they’re flapping their wings!  Virginia just started walking at the beginning of October so she’s definitely at this stage right now (as you can see!).

owl costume in flight

Why make an owl costume you ask?
For over a month I’ve been trying to decide what Halloween costume to make for Virginia.  Now that she’s 15 months old, and starting to show her own personality and interests, I thought I’d like to make her a costume to reflect something she seems to like at this point in her life.

Right now she seems particularly drawn to all things outdoors, specifically leaves, trees, squirrels, birds, airplanes, flowers, and the moon.  I’ve been collecting ideas on Pinterest, which is always a good starting point for inspiration, and found some cute ideas for trees, squirrels and owls.

owl costume03

Then this past Sunday I just had the urge to get this project started!  You know that feeling when you want to do something and you need to get it done NOW!?  Yeah, that’s pretty much how I felt.  At that point I was leaning toward making her a tree and incorporating a squirrel and a bird, kind of like this cute little costume from Probably Actually.

But I also just wanted to start making something and didn’t want to go to the store.  Does this ever happen to you?  I get so frustrated going to the store!  It seems like such a process these days and then I feel deflated because after all the time, effort, and money, I still don’t end up with what I really wanted.  So I was determined to make something work from what I already had in my fabric stash.

owl costume02

After digging around in the attic I settled on an old pink paisley cotton bed sheet that already had a number of chunks missing from other past projects, as well as a large remnant of blue fleece material I got for free at an Etsy event which I attended a few months back at the local fabric store, Stitch.

At this point I had abandoned the adorable tree idea and started to think about this cute owl costume that I saw from Martin Family Times.  I figured I could make a new crocheted owl hat (I made one for Virginia last winter) from the Repeat Crafter Me free pattern instead of making one from fabric as shown in the above mentioned inspiration.

Originally, I planned to make a cape of fabric feathers, similar to the inspiration, but I quickly changed my mind and went for a fitted poncho instead, mostly because I wanted something that she couldn’t easy take off!

owl costume front and back

How to make the feathery fabric owl poncho:
First I measured Virginia’s “wing span” (24 inches from wrist to wrist), which gave me the diameter for my foundation fabric (the blue fleece).  I also figured out how big of a hole I needed for her head (about a 4.5 inch diameter circle in her case) then added a small slit to be able to put it over her head.

Next I cut a second circle 4 inches bigger than the first from the “feather fabric,” in this case a light weight cotton bed sheet.

owl costume07

owl costume06

owl costume08

Now I took my paper pattern and folded it in half, than half again, and again, and again, etc, until I had a circle with evenly spaced segments to base my feathers off of.

Next I sewed the two circles together along the inner circle (where her head goes) and the outer circle to hold everything in place and cut out the outermost row of feathers.

owl costume09

For each successive row, I cut my paper pattern 4 inches smaller in diameter, traced it onto the front of the costume using chalk, sewed along the chalk line, then cut the feathers out, staggering them over the previous row.  To cut out the feathers while the fabric was sewn down, I used a pair of small, sharp scissors and was very careful not to cut through the foundation fabric.  After the feathers were cut out, I flipped them up and sewed all the way around the row of feathers again very close to the edge of the fold, thus hiding the original line of stitching.  This gave the feathers a little more “lift” and dimension.

owl costume05

owl costume11

owl costume12

I like the way the raw, fraying edges of the fabric adds to its “featheriness” don’t you?

Once the whole poncho was complete I sewed two vertical lines from the bottom up, leaving enough room for her arms, which created “sleeves” and also makes it nearly impossible for Virginia to remove it once it is on (HA!).

To finish it off I created my very own bias tape for the neckline (which I sewed on inside out, oops!) and a single, sew-on snap secures the neckline in the back to give it snug fit.

owl costume10

Crochet owl hat modifications:
As mentioned above, the crochet owl hat pattern that I based Virginia’s hat on was originally by Repeat Crafter me, which is a WONDERFUL pattern all on its own.  I’ve made this hat in several sizes following the pattern to the letter and they always turned out beautifully.  But for this time I wanted to alter the pattern a bit to make it a bit warmer.  To do this I first switched yarns (from 100% acrylic to 100% super wash Marino wool) and used a slightly bulkier yarn BUT kept the same size hook (H) so as to make a tighter stitch.  In addition to using a bulkier yarn, I also worked the whole pattern in half double crochet instead of double crochet.  Of course this meant that I had to add more rows.  All in all I’m very happy with the way the hat turned out, even though the half double stitch shows the seam way more than when I did a double crochet stitch, but I can live with that.

owl costume01

Oh, and did you notice that she’s got a little crocheted mouse?  I made it years ago from a pattern out of the book Amigurumi!: Super Happy Crochet Cute

owl costume04

I couldn’t be a prouder owl momma!

Keep up with all things zween make sure you like me on Facebook, where I update regularly about all things crochet, baby, thrifting, and upcycling!

I hope that you’ve enjoyed this post!  Happy crafting and happy Halloween!

1 Comment

Filed under Hollidays, Tutorials

The Plarn Project; Plastic Bags Transformed

Print

Today I am submitting my proposal to be a part of the Akron Mini Maker Faire on November 2, 2013.

Project Summary:
By transforming the ubiquitous plastic super market sack into chic and durable handbags, Emily Lindberg is diverting hundreds of plastic bags from landfills.  The Plarn Project; Plastic Bags Transformed, showcases these creations so as to inspire others to see the potential in what can be made out of trash.  In addition to inspiration, the project educates the public about the stress that plastic bags place on our ecosystem, and Emily will be instructing willing participants how to create their own plastic yarn (plarn) out of 100% recycled material.

Untitled

(Plarn medicine bag)

Untitled

(Plarn belt pouch for cell phone)

plarn owl wristlet

(Plarn owl wristlet purse)

Untitled

(Plarn shoulder bag)

Along with actual examples of my most recent plarn creations, I will be providing key statistics and facts about the effect that plastic bags have had on our environment since their introduction in 1977.

I will also be conducting ongoing demonstrations of plarn making for anyone who is interested and will have plenty of plastic bags on hand so that participants can make as much as they’d like!

I hope that my proposal is accepted, and if it is, I hope that you can make it out to see me!

***Update***

Looks like I’ll be going to be a maker in the faire!!!  So come on out to see me and all the other makers!  Also, be sure to like my facebook page for updates on all things zween as well as reminders about the faire.  See you soon!

6 Comments

Filed under Upcycled

Luau Party with DIY style

Untitled

Happy 1st birthday to my baby girl Virginia!  I can’t believe she is one year old today!

To celebrate Virginia’s first year of life we decided to throw her a Luau.  Why a luau you ask?  Well, it is July, so it seemed appropriate enough, but actually there is a funny story as to how we came up with the idea in the first place.  Back in February, when Virginia was just 7 months old, Jon bought a pineapple that sat ripening on our kitchen counter for several days.  We decided that it would be a good idea to put the whole pineapple on Virginia’s high chair tray so that she could touch it and explore the interesting texture of the pineapple.  Well, let’s just say she was a little apprehensive of this strange and poky fruit.  She didn’t cry or anything, just pulled her hands in toward her chest whenever the fruit got too near.  We have it on video and it’s one of my all time favorites.  Afterwords I joked to Jon that we should throw Virginia a Luau for her 1sth birthday.  After the seed was planted I just couldn’t get the idea out of my head, it just seemed like she was meant to have a Luau birthday, and here we are!

Of course we couldn’t just buy a few tiki torches, plastic leis, grass skirts, have a pig roast, and call it a day!  Read on to see how we transformed ordinary cardboard boxes, t-shirts, and produce into some pretty neat Luau decor.  I credit many of my ideas to Pinterest, where I got so much of my inspiration (see my luau pinterest board here), my husband for his amazing aptitude for drawing tiki masks and hibiscus flowers (he’s spent many hours painting signs for Trader Joe’s), and my mom awesome cake decorating abilities!

I first want to mention that this was a lot of work.  A LOT.  But it was worth it.  Just keep that mind that if you want to recreate some of the decorations that we have made, you will need a lot of time, or a lot of hands, to get it done.  So although this is a great recourse for people who want to throw their own DIY luau, it is not for the procrastinations out there.  Sorry.

Untitled

Untitled

First thing’s first, when going to a party, any party, you have to know where it is. We threw the luau in my parent’s back yard (actually, on their newly finished patio!) and while many guests had been there before, some had not and I wanted to not only set a festive mood, but make it obvious as to where the party was happening. Balloons on the mailbox are an obvious choice, but in this situation I thought tissue paper flowers (made out of recycled tissue paper from Virginia’s baby shower and originally used as decor in her first nursery) and hand-painted aloha signs on either side of the driveway were more appropriate.

1003278_689457624413213_2058661670_n

The above photo is by Mary Norgard, Virginia’s lovely Great Aunt!

Once guests make their way to the back of the house they are greeted by four tiki masks flanking the begining and end of my parent’s lovely stone path, and two giant hanging painted cardboard signs.  The first sign reads “Hau’ oli la hanau Virginia” which means happy birthday Virginia in Hawaiian, and the other reads “Aloha.”

Jon gets full credit for making and hanging the signs.  Each letter was hand-drawn on cardboard, cut out, painted with acrylic paint, and then strung together with twine.   I’d also like to mention that all of our cardboard decorations were made using recycled cardboard from Trader Joe’s (actually they are twice recycled, because before we used them for decorations we made a box maze for Virginia with them a few weeks ago!).

Untitled

Untitled

Untitled

Untitled

Hand-painted tiki masks were tied to tiki torches and trees, while hibiscus flowers were placed in potted flowers, hung from umbrellas, and tied to the legs of Virginia’s high chair.

Untitled

Untitled

Untitled

Untitled

Untitled

In accordance with Hawaiian tradition, each guest received a lei upon arrival to the luau.  Each lei was lovingly hand-made from recycled t-shirts using this tutorial that I found on Pinterest.  From experience, the softer high quality shirts yielded nicer “flowers.” To keep the leis from getting tangled, I hung them from a hand-carved wooden sculpture of a family that I bought from my mom during my trip to Ghana ten years ago. They sat next to the entrance of the luau on the table with the stereo (stocked with Hawaiian music CDs from the library) and a sign that reads “Mahalo” or “thank you.”

Untitled

Untitled

I used two green recycled t-shirts and some elastic to create Virginia’s grass skirt. It was VERY easy to make. To make one yourself cut a shirt horizontally underneath the arms. Using the bottom tube that remains, cut the shirt in 1.5 inch strips from top to bottom, stopping each cut about 2 inches from the bottom hem. That will become the top of your skirt. Repeat this process with a second shirt. Put shirt inside of the other and cut slits into both every 4 inches or so. Weave your elastic through the holes and sew the elastic to itself, creating the waist band. Trim the skirt to desired length. I showed my mom Virginia’s skirt earlier in the week and she decided to make one for Virginia’s older cousin. I really liked how they both turned out!

Untitled

Untitled

A wreath made from several paper drink umbrellas stuck into one of those packed-straw wreath forms from the craft store was a fun little project and another one that was Pinterest-inspired.  I thought it was a cute idea, but when I saw a box of over 100 of those tiny umbrellas for only $1 at a church rummage sale last weekend, I had to make one myself.  I wasn’t really sure where I’d end up putting it, but the gazebos door seemed to be as good a place as any.

Untitled

Untitled

And what would a party be without food?  We were a little ambitious with some of our food choices, as a lot of the things were a bit labor intensive but had to be done kind of at the last-minute.  We had a veggie tray, complete with palm tree made from a carrot and bell pepper sitting on an island of humus.  A pineapple cream cheese spread that looked like a pineapple.  A fruit salad in a watermelon bowl cut like a tiki mask.  To drink we had a pineapple, lemonade punch and the main course was Hawaiian ham and veggie kababs.  Finally, the cake, made by my mother, was in the shape of a roasted pig and came out fabulous (both in looks and in taste)!

Untitled

Untitled

Untitled

Untitled

Untitled

Untitled

My Mom also made a “smash cake,” which Virginia throughly enjoyed of course.

Untitled

Untitled

I can’t wait to have more luaus in the future!

**This post has just been added to the Make it Pretty Monday link party over on the Dedicated house, MWC Mondays on Making the World Cuer, and Motivate Me Monday on Keeping it Simple!

7 Comments

Filed under Events

Crafting family fun; DIY cardboard box maze

Untitled

If you are a parent, but even if you’re not, you’ve probably heard the age-old adage that a child will enjoy playing with the box that a toy comes in more than the toy itself.

Today I’d like to share some photos of a little family craft project (well, not so little actually) that we started one rainy, dreary morning this week.  It’s a giant maze made from recycled cardboard boxes that encompasses our entire dining room (I knew there was a reason we’ve been dragging our feet finding a dining room table).

Untitled

Untitled

All you need is several cardboard boxes (ours were complements of Trader Joe’s, thanks to my husband, our insider connection) and some packing tape or even duct tape.  Just fit the boxes together in whatever configuration you like and tape them together where needed to keep the structure stable.

Untitled

Virginia is just a couple of weeks from her first birthday now (!!!!) and isn’t yet walking.  She LOVES crawling around this maze.  We’ve had it up for about four days now and it’s been good for HOURS of entertainment!  She just loves to chase momma around the maze and be chased herself!  Papa got in on the action too of course, but at over six feet tall, he had some maneuverability issues.  By the way, as an adult, army crawling through a cardboard maze is quite the workout!  Sometimes we mix it up and place rattles, balls, and other small toys around the maze for her to find, but mostly she’s content to crawl in and out, squealing in delight all the way.

Untitled-1

This is a great project for those days when you just can’t get out and I’m sure would work great with older kids as well.

If this post has inspired you to create your own box maze I’d love to hear about it!  Write about it in the comments below or on the zween facebook page.  Happy crafting!

Untitled

2 Comments

Filed under Home, Just For Fun, Upcycled

High impact, low cost nursery

Untitled

Welcome to Virginia’s fun and whimsical nursery! It is said that a baby’s true “work” is play. Through play, babies are learning about complex ideas that we as grown-ups take for granted.

I wanted to create a comfortable and fun space for Virginia to do this very important work that she needs to do, but to be perfectly honest, I also wanted a space that would be comfortable and enjoyable for myself to spend time in too. Lucky me, this is the second nursery that I got to design for Virginia! (Check out her first nursery here)

Why two nurseries you may ask?  For the first six months of Virginia’s life we were living in an apartment, but in January of this year we moved into our very own home! The first time around I had the luxury of time when working on getting the space just the way I wanted it.  Something that was in much shorter supply 6 months later!  Luckily, we already had the furniture and some of the decor elements made, it was just a matter of creating and installing the new decals, a process that was much easier the second time around.

So without further ado, let’s take a tour shall we?  To give you a sense of scale let me just say that this room is about 11 feet by 8.5 feet.  We’ll start with what you see first when you first walk in the door.

Untitled

The statement piece is the floor to ceiling stylized deciduous tree on the opposite (west) wall, along with the adorable and over-sized woodland creatures.  Like in her previous room, this tree was made by cutting out shapes of contact paper and sticking them to the wall (for further information on this process, check out this post).  What I really like about these new decals is the boldness and simplicity of the white against the dark brownish gray wall.  It’s a wall color that I would never choose myself normally because I like really bright rooms.  but by adding so many decals, it really lightened and livens the room up.  To the left (out of view) is a bookshelf and to the right (also out of view) is her dresser.

Untitled

As you turn to your left (toward to south wall), you will see the 3 dimensional foam core butterflies that my husband made for Virginia’s first nursery.  These are adhered to the wall with simple, double-sided tape.  I like that it looks like they are flying through the window in a swarm and out the door of her room (just out of frame to the left).

Untitled

Untitled

Although we didn’t have a very large budget to create this nursery, my husband and I don’t like to sacrifice style.  We love searching for the perfect pieces on Craigslist and at thrift stores.  Some items were kept from my childhood and are ready to have another life with our daughter.  Though this does keep our budget in check, it also goes along with the values of our family, which we hope to instill in Virginia from the start.  That goes not only for the furnishings and decor, but toys as well.  With very few exceptions, nearly all of Virginia’s toys are either handmade, vintage, hand-me-downs, or second-hand.

Now we’ll turn 180 degrees to face the north wall and the crib. To the right I created a little reading corner under a hanging lamp. This is also a favorite spot for evening snuggles and nursing. The folding disc chair (which I’ve had since my college years) replaced the rocking chair from the previous nursery for a couple of reasons. First, there just wasn’t as much room this time around, and second, we use the nursery differently than when Virginia was a newborn (she is 10.5 months now). Now that she is more mobile we spend the majority of our time in this room playing on the floor (as opposed to nursing).  As far as nursing goes, we mostly do that in our bed where we can lie down and have some quiet mommy and Virginia time, away from distractions.  I LOVE the rocking chair, so we moved that to the living room where it can get plenty of use.

Untitled

Untitled

This corner is still a work in progress. I plan on making some very shallow shelving out of recycled shipping pallets to display/store some of Virginia’s books along the short wall between the window and the closet door. The lamp shade, along with the one pictured on the bookshelf, were crocheted out of white cotton yarn.  Even Virginia’s crib sheets were handmade from vintage full bed sheets.

And making our way full circle, Virginia’s dresser is nuzzled perfectly between the closet door (left) and entrance.  Her impressive book collection was mostly acquired through the local library’s book sales, or as gifts from family and friends.  The owl fabric collage is one that I made a couple ago.

Untitled

Untitled

And when looking for the perfect container for Virginia’s collection of wooden blocks, this vintage Du Pont blasting cap crate which housed my record collection for years, seemed to be the perfect fit, proving that toy boxes can take many forms.

Untitled

So how low-cost was this nursery?  Not including books and toys I calculate the cost just under $225!  Here’s how it breaks down.

Decor
Two rolls of Contact paper (to make decals)- $11
Foam core $5
White Lamp base, Goodwill $4
Cotton yarn for making two lamp shades $8

Furnishings
Vintage book shelf, Craigslist $25
White dresser, Craigslist $30
Crib (without mattress), Craigslist $100
Organic crib mattress, Target $80 (gift from grandparents) our cost $0
Disc chair, already owned for several years $0
5×7 Handwoven wool rug originally from World market, Craigslist $40
Child’s table and chair from my childhood $0 (table was handmade by my grandfather)


**This post has been added to Make it Pretty Monday on the Dedicated House, so go check out some other great links there!

1 Comment

Filed under Home, Uncategorized

Sneak Peek for Crafty Mart Show Tomorrow!

Untitled

So if you are reading this post and are in the Cleveland/ Akron area, I’m just going to assume that I’ll be seeing you tomorrow at the Crafty Mart; School’s Out Show right?

If you do make it to the show, here’s what you can expect to see from zween…

Untitled

Untitled

Untitled

Some very lovely Plarn handbags and messenger bags with recycled handles.

Untitled

Some Plarn Owl Wristlets.

Untitled

And there will even be a few Owl Weeble Wobbles as well.

When you come to the show, make sure to participate in the charity raffle, that will benefit the Heaven Can Wait, volunteer-run animal rescue center. Below is the Owl Shoulder Bag that I’ll be donating for this charity raffle. It’s a good cause, so buy some tickets! See you at Crafty Mart!

Untitled

PS- If you’re NOT in the Cleveland/ Akron area this weekend, or are reading this post after June 1st, 2013, you can still shop for zween products at my new Etsy shop!  That’s right everyone, I FINALLY opened my Etsy shop!!!  So please go here to check it out 🙂

This post was linked to the Dedicated House’s Party “Anything Blue Friday” for the picture featuring my Sarah Grace handbag with the blue handles and medallion decoration.

Leave a comment

Filed under Events, Shop, Upcycled

Plarn; a labor of love?

Untitled

I am making new, durable objects out of something we think of as worthless trash while transforming it in such a way that most people I have come across don’t even know that these were once plastic bags.  But, reflecting back over my long history with plarn, I sometimes wonder, “is it worth it?”

To say that crocheting with plastic bags is labor intensive is an understatement quite frankly.  If you are unfamiliar with the process allow me to break it down for you.

First, I collect the plastic grocery sacks.  Simple right?

That is step one, and already I have hit my first obstacle because I do not have the opportunity to procure bags in the normal fashion.  I’m not saying that I don’t accumulate plastic bags because I am a canvas-bag-toting-saint.  I am saying that my husband works at a Trader Joe’s and does all of our grocery shopping.  He should use reusable bags exclusively but he doesn’t.  Instead he usually uses the paper bags that Trader Joe’s give out (and reuses them over and over until they wear out).  In fact, I didn’t know that TJs even had a plastic bag option until Jon prof read this post.  But I digress.

crocheting with plarn

So where do I get all my plastic bags you wonder?  A couple of places.  First, I have a number of friends and family members who save up their bags and give them to me.  This is how I get the majority of my bags.  But since most of my closest friends and family members try to use reusable market bags whenever possible (which is a good thing!) it can take quite a long time to accumulate the quantity of bags that is necessary to create the products that I make.

chevron in plarn

The other way that I obtain bags is a little more tricky.  I go to super markets and take the bags that other people bring for recycling.  Yes, you heard me correctly; I steal plastic bags.  Now here I will rant a bit because this bothers me.  Why should I be made to feel like a criminal for taking something that nobody wants (plastic bags) and recycling it?  Once, I went to a local grocery store (the Giant Eagle on W 117th, Cleveland) and I wanted some used bags.  My husband was with me and for some reason he decided that he wanted to actually ask the manager if it would be all right if I take the bags.  To our surprise his answer was NO, it was not all right!  At this point I told him why I wanted the bags and his response was, “well how am I to know for sure what you will do with the bags?  For all I know you could take them and throw them in the lake!”  I kid you not, that is what he said.  Then I went to another local super market (Marc’s in Lakewood, OH).  The first time I went I asked the person at the customer service counter if I could take their recycled bags and was relieved when the man said “of course.”  I did this on a couple of occasions until one day I went in and the bin where the bag are returned was bolted shut!  I now only resort to “stealing” bags when I am particularly desperate for a certain color, or my supply is non-existent.

Untitled

The next step is sorting the bags.  Above is a particularly good haul of plastic bags that my mom and brother collected over several months and gave to me all at one time.  Each bag is checked for cleanness and sorted by color.  Below I have made small bundles of like-colored bags, which breaks them into more manageable amounts when I go to make them into plarn.

Untitled

Untitled

After I have at least 30 or so bags of one color I’m ready to make a ball of plarn, which involves cutting each bag, one at a time, and looping the individual pieces together, as shown below.  For a more detailed explanation of this process you may want to read my tutorial on how to make plarn.

Untitled

Untitled

ball of plarn from kroger bags

Wow, that was a lot of work!  But wait, I haven’t even “made” anything yet!

Next comes the fun part, crocheting the ubiquitous grocery bags into handbags, durable messenger bags, baskets, and cute little owls that sit in your home and make you happy.  This is the part that reminds me of the classic children’s story, Rumplestiltskin.  Instead of turning straw into gold I am transforming trash into…

Untitled

Untitled

Untitled

some lovely purses…

plarn owl wristlet

owl wristlets…

plarn chevron messenger bag

a chevron messenger bag…

Untitled

acorn baskets…

Untitled

and cute owl decorations.

I enjoy coming up with different crocheted designs and finding old purses past their prime to take apart and use their zippers, buckles and handles.

But what about the question that I pose in the title of this post; is plarn a labor of love?

This is something that I have been thinking about more and more in the last few months following my participation in the Last Minute Market.  I had a wonderful time at the show.  It was the largest show that I have ever done to date and it was also the first time that I showcased ONLY my plarn items (as opposed to a hodge-podge of upcycled items).  The lowest price point at my table was $25.  To me this was all such a big risk.  What would people think?  Would I even sell enough to cover my table fee?  Three hours into the eight-hour show without a single sale I was beginning to have serious doubts.  But I didn’t give up.  The entire day I stood next to my table and engaged each and every person who walked by and gave my work the slightest side-ways glance.  I greeted them and asked them things like, “do you know what these are made of?” motioning toward my table.  To my surprise, most people couldn’t guess that everything on my table was made from plastic grocery bags.

That’s when I would bring them over to my table and show them the poster below as I briefly explained the process.  As I did so I could hear the excitement in my voice about how I developed my technique over the past seven and a half years, and how when I started I barely knew how to crochet at all!

plarn recycle poster

Inevitably they would come to the same conclusion and ask the same question, which were, “this must take you a long time!” and “how many bags does it take to make one of these?”

Though I do my best to estimate how much time it takes me to make one of my purses and how many bags I use, the truth is that it is impossible to calculate.  Okay, maybe it’s not technically impossible, but it’s not the way I want to spend my time, making plarn and crocheting take long enough as it is!

However, what I suspect is at the root of their questions and comments is this, “is it really worth your time to do this?”  Excellent question, and one that I’m trying to figure out for myself.  It’s a question that a lot of craftspeople face, which is, ‘can I really charge what I would need to charge to pay for my time’ (because let’s face it, in my case that is all you are really paying for since the materials are mostly free).

The answer is…

No, I could never really charge enough for the individual items that I create to make my time worth it.  Yet I still keep making them.  I make them because it really is a labor of love; it’s something that I need to do.  I need to make these things with my hands.  I need to share them with other people.  I need to photograph them and write about them and talk to other people about them.  I need them to leave my home and live their own lives with other people.  I need them to be made out of trash, because it is the act of making something out of nothing that is attractive to me.  Plarn gives me an avenue to design and invent while appealing to my sensibilities toward the environment.  And now that I’m a mother, I want to pass on the ideals about reusing, recycling and resourcefulness to my daughter.

Untitled

If you have liked this article I invite you to follow zween on Facebook.  You may also like to check out these previous blog posts that I have written about plarn specifically:

Crocheting with plastic bags; a six year journey
Toot Tuesday; Making Plarn
Wise Owl Plarn Wristlets
Cheveron Ombre Messenger Bag

3 Comments

Filed under About, Upcycled